Pages

Thursday 26 November 2015

Sew Over It Ultimate Shift Dress x 2

I have been trying to write this post for a whole week now but life keeps conspiring against me!  The weather keeps being too rubbish to take photos and now we have no internet at home for a few weeks!  Aaargh!  If I look really tired in these photos it is because I was, I've had a poorly child for the past few days and took the opportunity of a break in vomit watch and a break in the weather to quickly take some photos! (The child is all better now and back at school which means I am back in work and able to use the work internet - yay!).


This dress is the Sew Over It Ultimate Shift dress which I hadn't really given a though to until I bought this fabric whilst out on my recent trip to Goldhawk Road when Marilla suggested it would be a great fit for the fabric.  The fabric is so deliciously soft that I was tempted to make pyjamas from it but I needed a new dress more!  We went out to a dinner thing last weekend and at first I thought I needed a posh frock but when I actually read the dress code and realised it was smart/casual I decided to make this.  Which was a bit of a shame because I had some plans with some silk and a gold skirt.  Oh well, there'll be a next time!


I started this dress on the Thursday night, hand sewed the hems on the Friday night then wore it out on the Saturday night - perfect! 


I was a bit unsure what size to make as going by the pattern measurements I should have made a size 12 but I have put on a few pounds recently so decided to err on the side of caution and make the 14.  The fit is fine so I am happy with my decision and the only change I made to the pattern was to lower the bust darts by 3cm which I have to do to most patterns. I also decided to line the body of the  dress to give the fabric a bit more substance.  I finished the back with a button and loop rather than a hook and eye, thinking it would be easier for me to do up myself as I do find hook and eyes so fiddly.  

I am so happy with my new dress and had a fab time at the dinner thing. I am so pleased I made a new dress for it, it gave me a bit of a confidence boost and helped me enjoy the evening so much more because I wasn't worrying about what I was wearing.  


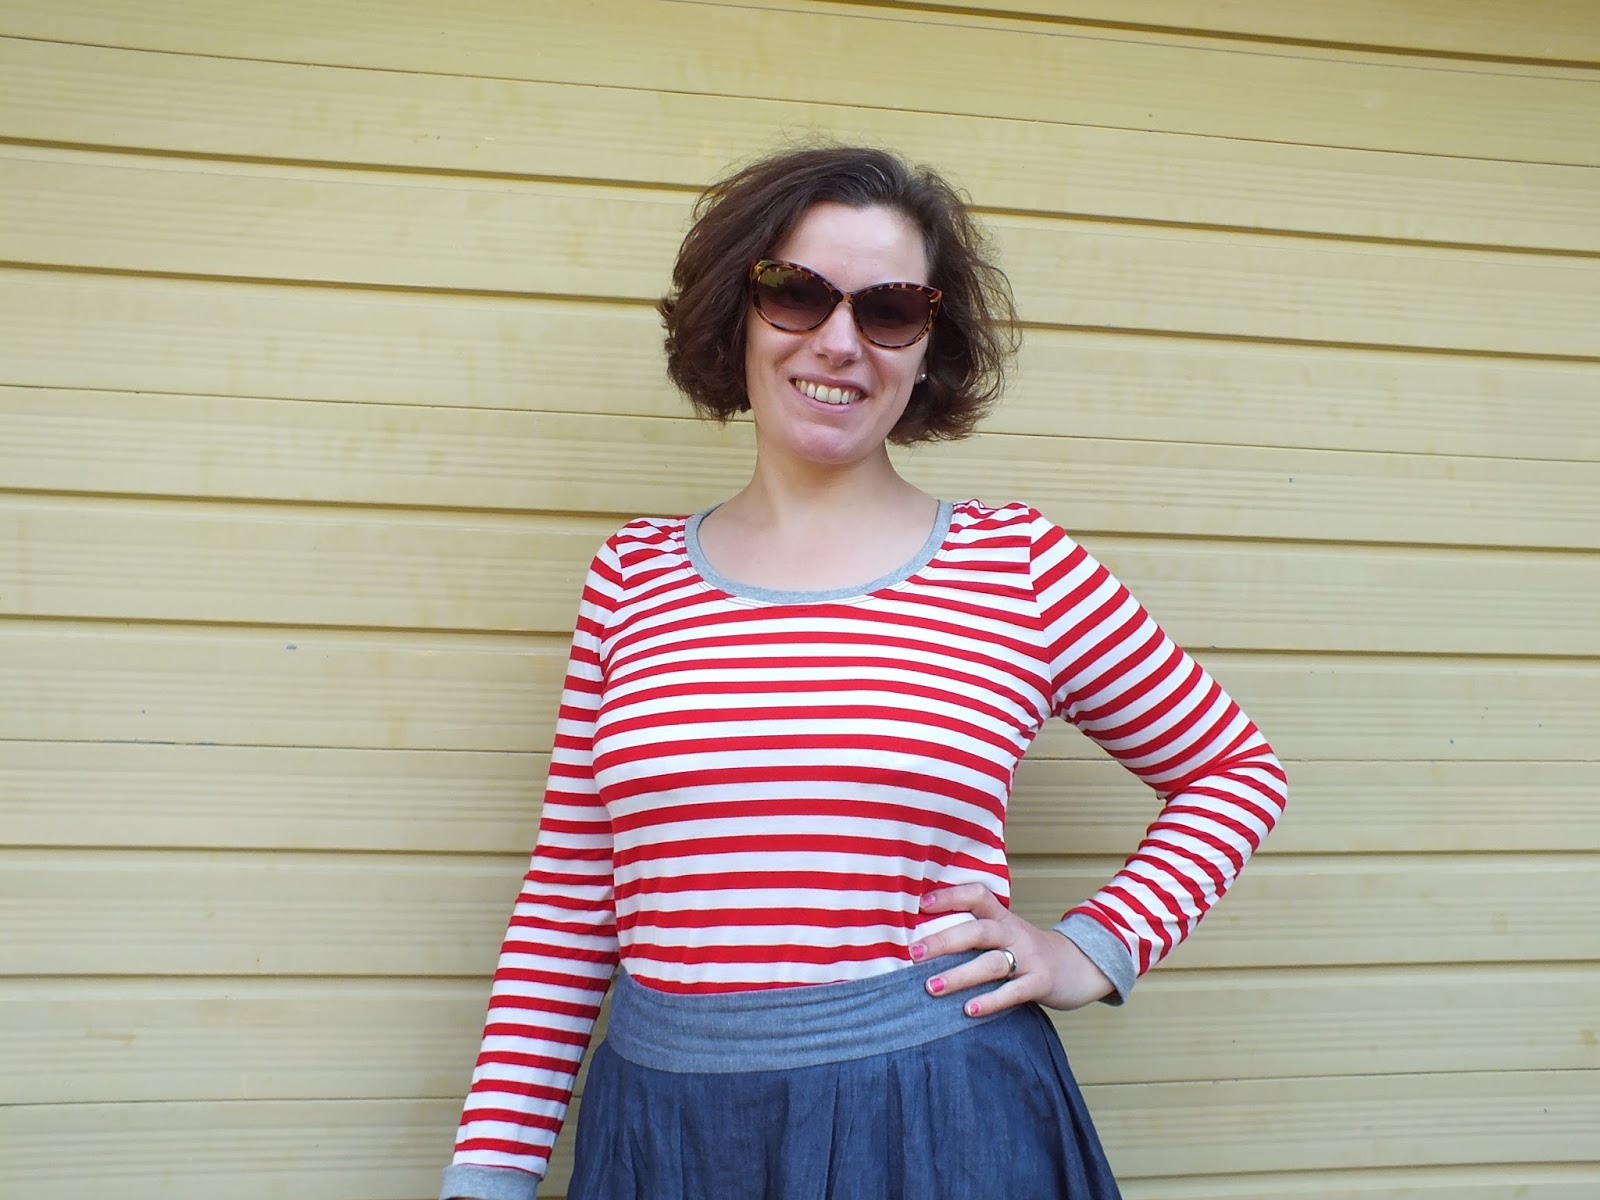
Because I loved the pattern so much I went straight on to make a jersey version in some fab stripy ponte roma that I picked up on the same shopping trip.  I felt like I bought a lot of fabric that day but actually I have used most of it already so my guilty feelings are lessening somewhat!


For this version, I cut the back on the fold, kept the rest of the dress as it was and added bands at the neck and cuffs - with anchors on!  This dress is the bees knees.  It is definitely a pyjama dress and I love it!  Since I finished it (last Tuesday) I have worn it 5 times, it is sooooo comfy!  

Checking out my stripe matching!

It was also incredibly quick to make since the majority of it was made on the overlocker.  I think I made it in 2 hours, which is quick by my standards.  I do spend an awful lot of time staring at the television when I'm supposed to be sewing!  


As I actually finished my dress in time I rewarded myself by sewing up some lovely lounge wear, none of which deserve a whole post of their own.  I made a pair of peach hudsons, a banana Lark Tee and a Linden with a gold glitter stag's head!!  Words cannot describe how much I love this jumper and I will not actually be wearing this as lounge wear until after the festive period (after spilling red wine down the front on its first outing!).   The morning after I finished it I realised that the quality of ribbing I used just wasn't up to scratch so I made the decision to unpick it and replace it with some gorgeous red and white striped ribbing I bought from KitschyCoo.  It's true love and I will be wearing this to every festive event I have to go to this Christmas, starting with a Guide party on Monday night!


Thursday 12 November 2015

Style 1711 - Victorian Outfit

I was in two minds about writing a blog post for this little outfit but in the end I decided that I wanted a record of it.  It wasn't a long or complicated make but I'm really happy with how it turned out. And the pictures made me laugh!


The pattern I used is Style 1711 from 1976 which I found almost by accident on eBay.  It is perfect for a Victorian style dressing up and I think I will make it again as normal wear, I like it!  I do enjoy using vintage patterns for children's wear probably more than for me as I don't have to worry about fitting issues.  I only changed two things when making this; I omitted the high neck band and finished the edge with a bias strip instead, and I left the back of the apron open for a more aprony look. Oh, and I left the frill off the bottom too!


I bought the fabric on my most recent trip to Goldhawk Road and I'm really pleased with it.  The grey/blue fabric for the main dress has a slight check running through it and is almost a trouser weight. I think the dress will get worn by itself a bit, I like the style of it.  The sleeves need shortening first though!

Following on from my last post I can confirm that reward charts also work on adults and as a reward for making a new dress to wear on Saturday night (not even started yet!) I am going to be heavily influenced by Marilla and make myself some nice loungewear! Featuring bananas!!


Thursday 5 November 2015

Marilla Walker Roberts Dungadress

I may as well change the name of my blog to "The Marilla Walker Appreciation Page"!  If we weren't friends I think she would suspect me of stalking her.  Ho hum, that's what you get for designing all the things I want to wear right now!


I finished this dress at about 11pm the night before going on a lovely jaunt to London to meet up with Marilla, Jo and Jane where I bought way more fabric than I normally do, and way more than I intended!  Among the bits I bought was a beautiful piece of burgundy coloured corduroy which I am intending to use for some Roberts dungarees, but that may have to wait a while as I have loads to be getting on with at the moment!


For this dress I used the final pattern and not the tester version which I had for my jumpsuit.  I decided to size down for this version for a slightly sleeker silhouette to a size two and am happy with how this turned out.  I like my jumpsuit being a bit roomier but I prefer this fit for a dress.  


The fabric I used this time is a lightweight stretch denim from eBay.  The stretch makes it so comfortable to wear - and explains why I could size down and still get it over my hips!! I could quite happily live in this dress.  In fact I have done for the past week (hence the crumply look) which means I obviously need more.  


I lined the bib and the pockets with scraps of my favourite ever fabric (used previously here).  In fact, I think I need to try wearing this with my Mathilde underneath for a really matchy matchy look - I think it'd be a winner!


For some reason, even though this dress is a relatively quick make, it still took me a week to finish.  Is anyone else finding the weather/clocks changing/general drizzle a bit draining at the moment?  I start sewing something, sit down to think about it and the next thing I know it's bed time!  I've got a dinner thing to go to next weekend and want to make myself a new top to wear and I need to produce a Victorian outfit for the child's school so I really need to crack on with things but I'm struggling to stay motivated.  I think I'm going to try a reward chart - if it works for toddlers it might just work for me!!


Monday 26 October 2015

Compagnie-M Louisa Dress

Before I start I feel I should just mention that the face in the majority of these pictures is not a reflection of the Child's feelings about this dress, more a reaction to being told to stop pulling funny faces so I could get a decent picture!  Oops, next time I guess I just take a photo of the funny face, except that she feels that to pull an adequately funny face she must also be standing in an equally ridiculous pose!


So the dress is the Louisa Dress by Compagnie-M.  I have recently made two other Compagnie-M dresses, the Mara Blouse and the Lotta Dress so this one completes the trilogy, and it was this pattern I really wanted when I bought the other two.  There are a lot of amazing versions of this dress around and Zoe has recently made one in the same fabric for her beautiful little girl.  I have to say though that I am not 100% happy with this dress but I think it is mostly down to me not reading the instructions properly when I was making it.  


I chose not to line the dress, as suggested, but instead finished the neck with bias binding which I made from the plain fabric used in the dress.  This was quite a stiff fabric and the binding does not lie completely flat and causes the neck to stick up a bit.  This is actually where my main disappointment with the dress lies as I know I could do better.  At some point I will take this off and add a lining.  My reason for not doing so before was I hadn't read the instructions before making the dress so didn't realise I needed a lining and didn't have anything suitable in my stash.  Lesson learnt!


My other issue with the dress is the pocket.  As far as I can make out (I may have misread the instructions) this is just fastened using the buttons, which does not seem very secure to me.  In fact, one of the buttons fell off on the dress' first outing at a birthday party.  I had warned her not to walk around with her hands in the pocket but what are pockets for if not to put hands in?!  I will put a line of stitching across the top of the pocket to secure it in future.


The fabric used for this dress is from the Small World line by Rae Hoekstra which I bought from The Village Haberdashery in May with this dress in mind.  I should really start buying more than 1m pieces for the Child now because although you can get quite a lot out of 1m, it isn't really enough for a dress anymore!  The contrast blue fabric came as a lovely present from Marilla and, as I said, is fairly stiff but works well with this a-line silhouette.  The Husband, Child and I all had a discussion (I think I talked and they nodded!) about what colour piping to do and "we" decided on orange.  There are so many colours in this beautiful fabric to choose from but I liked the orange and royal blue together.  I used a yellow lapped zip in the back because that was what I had.  The colour shows through a bit but I like it.

On the whole I like this dress.  I made a size 5 for my smallish 5 and a half year old and it fits with room for growth.  (I like to get 2 year's wear out of clothes so I can spend more time sewing for me!)  I love the shape of the dress, the pocket and the piping and, like Zoe says, the possibilities for contrast fabrics.  I am not so happy with my level of finish on the dress which is obviously something I can change.   Having now sewn with all three of the Compagnie-M patterns that I bought I am surprised to find that this one is not my favourite and that the Lotta dress is.  I will probably make this again at some point, maybe when the adult version comes out and we can have matching dresses!


Sunday 11 October 2015

Marilla Walker Roberts Collection

I am so excited about Marilla's new pattern release, the Roberts Collection.  I know this is my third blog post in a row featuring Marilla's patterns (sorry, not sorry!) but I really feel this collection is just awesome!  There are four and a half options to choose from (jumpsuit, dungarees, dungadress in two lengths and a top) and at just £8.40 that is incredible value for money!


I was asked to be a tester and I decided to start with the jumpsuit first, although it is not going to get a lot of wear until the weather warms up again as I made it in a lineny type fabric.  I know the pattern has changed slightly since the tester version but I think that most of the changes were to the dress version so this should still be a good representation of the final product.


I made a straight size 3 all over and the fit is absolutely spot on for me.  The only two things I changed when I was making it was to shorten the legs because the linen had distorted at the bottom of the leg and I was really impatient and just hacked it off!  This means I don't have as much of a turn up as I would have liked but I will have a play around with this when I wear it next.  The other thing I changed was to put my buttons and buttonholes on the wrong side as my fabric matched up better this way!    When I tried to do it the correct way round the stripes were slightly out which was soooo annoying!


One of the (many) things I love about this pattern is the detail on the back.  I can't wait to make this in denim because the seam will really stand out - I've seen Marilla's and it's amazing!  I also love the pleats at the front which give a subtle bit of shaping.  


I can't wait to make more versions of this pattern.  On a recent trip to Walthamstow I picked up 3m of denim which is fairly stiff but I think it'll be perfect for a dungadress.   I have also ordered some of the same denim Marilla made her sample jumpsuit in from an EBay seller which I am intending to make the dungarees from.  I would love a denim jumpsuit too but I think I will find it too chilly to wear until next spring so will probably wait until then to make it, and the same for the top.  I do feel the cold though and work in a really cold warehouse so tend to wear a lot of layers!


Speaking of layers, I am very short on vests, knickers and layering tops at the moment (despite making two larks recently), as is the Child, so I think I am going to have a big jersey sewing week ahead of me.  Not interesting sewing, but necessary!  What is everybody else up to this week?


Tuesday 6 October 2015

Love Sewing Magazine - Marilla Walker Sailor Dress

When my copy of Love Sewing Magazine plopped through my door yesterday afternoon my plans for the evening suddenly changed!  I was going to have made a start on the Child's new dress but this seemed more important!  The pattern is a new version of Marilla Walker's Sailor Top which I made in June and wore a lot over the summer, so I knew I would love this (and I do!).


Marilla has updated the pattern to include multiple sizes, a dress length as well as top, longer sleeves (although I lengthened mine further) and some other little changes.  This pattern comes on a pattern sheet with the magazine so it was really easy to trace out and start making straight away.


I only made two small changes to the pattern.  As I said before I lengthened the sleeves by a few centimetres as I do prefer a longer sleeve length (I get cold easily!) and I followed the instructions for the original top for the neckline so my ribbon is on the inside rather than the outside.  This was purely because I used yellow ribbon and wanted it on the inside.  My favourite bit about this pattern is the shoulder gussets, they really lend themselves to being made in stripes but I would like to try some contrast fabrics next time like Kathryn's which I love.  Or maybe two separate solids.


The jersey I used for this dress is the same as I used for my last Sailor top but in the reverse colour way.  This is a very stable jersey in a lovely weight which is perfect for this dress.  It is also very soft and this dress definitely comes under the secret pyjamas category! Unfortunately the eBay seller this came from is out of stock of this fabric but if there was more I would buy a lot of it.  I do have another two metres left and I think I'm going to save it until I find the right pattern to use it on.


For the pocket I used a small piece of Nani Iro double gauze which I had leftover from a Maya dress I made in August.  I do love that dress so much but it won't be getting much wear until the spring (I had it on this morning and was a bit chilly on the school run!) so it will be nice to see the fabric on something I hope to wear until the weather gets really cold.


While I had the remains of my Nani Iro out I pieced them together and whipped up a quick cowl.  For the other side I used the same jersey I used for my dress so it's lovely and soft on both sides.  It's long enough to wrap around twice but could be worn just draped over once.


I am really pleased I found a use for the rest of this fabric, I don't like wasting any fabric but this is my favourite colour and it's perfectly suited to being a scarf.  I think I'll be wearing this most days from now on!


Thursday 1 October 2015

Two Larks, a Linden and a Maya

There hasn't been a huge amount of activity 'round these parts lately due to one thing an another and I'm not quite sure what, but then I had a few days where I managed to churn out four pieces of clothing!  It's taken me a while to photograph them but I finally managed it this morning and, well, here they are!


The photo thing took a bit longer than usual because my husband, who normally takes my photos, has been too busy (how dare he!) so I thought I would try and take my tripod and wander further afield à la Gillian and try to join in with her "Better Pictures Project".  However, I think I was having a bad week because in all the photos I took, regardless of location, I looked terrible!  I'm not saying that I only want to have the glossy perfect (like that's ever going to happen!) photos on here but there is a line and those photos definitely crossed it.  So I tried again this morning and found my favourite place for taking photos is....in front of my garage.  The yellow door may have something to do with it!


First up on my epic making week was a Linden.  Now I know the whole world and her cat made this pattern like, last year, but I'm slow on the uptake!  A couple of weeks ago The Village Haberdashery posted a picture on Instagram of some beautiful Liberty sweat shirting and suggested ribbing to go with it and I think I waited a whole week before ordering.  I used my birthday Stash Points to soften the blow a bit and feeling optimistic only ordered 1 metre.  I do love a Liberty print and this just spoke to me!


The fabric is lovely and thick with not a lot of stretch in it, unlike the sweat shirting I bought from Kitschycoo earlier this year which I used to make a couple of Bonnies.  This time I wanted something looser and the obvious answer was the Linden.  As so many people have already said before me this is a very quick and satisfying make.  I taped the pattern together and sewed it up all in one evening whilst watching television and I was still in bed by 10pm!


To get the sweatshirt out of 1 metre of fabric means there is a seam down the back which I haven't managed to get a photo of because I totally forgot it was there when I was taking the photos!  However I really don't think it detracts from the sweater in any way and at £4.50 per quarter I really wouldn't have been able to afford the extra half metre to prevent it.  I love this jumper so much, the colours work really well together and I know this will get a lot of wear when the weather turns a bit cooler.  This was definitely a special purchase but I am so happy with how it turned out.


While I was buying the Linden pattern it made sense to put the newest Grainline pattern, the Lark Tee, into my basket at the same time.  I actually have a lot of t-shirt type patterns already so probably didn't neeeeed this one but I wanted it!  I wanted a less fitted top than the ones I currently have and something that would be perfect for layering under things in the autumn.  Also, I had seen Marilla's and loved it!  For my first version I used some red and white striped jersey which has been sat in my stash for a while because I don't like the quality of it.  It is too lightweight for my liking and was actually not a pleasant make.  My sewing machine also took exception to it and ate some of the sleeve hem which is why this one has cuffs!  It is also unhemmed and I think it may stay that way!


I was happy with the fit (I think I could probably have sized down but since I was looking for something a bit looser I decided to go with it) so I cut out another one straight away using some beautiful yellow striped jersey which Marilla gave to me a couple of months ago. This has been waiting for the perfect pattern and I think it found it!  I had been wondering whether to make a light weight cardi with it, but this is going to get far more use and it's probably the nicest t shirt I've ever owned!  It was so nice to sew I even cracked out the twin needle on it which behaved perfectly!


Lastly, I made a new Maya.  I have made this pattern twice before, once as a top length and more recently as a dress. I have worn them both a lot but particularly the second one has been washed twice a week since I made it!  I really wanted a denimy look one for autumn that could be layered up and it just so happened that my last piece of chambray in my stash was the perfect colour and weight for my vision.  I bought a lot of chambray last year just in case world stocks run low (I heard the rumour about Prosecco and have been buying that in bulk too!!) so hopefully the world doesn't run out now I have used all of mine up.  Or I just need to buy more!


This version is identical to my last with the exception of the patch pockets on the front rather than a top pocket.  Once again I was too lazy to do french seams and everything is overlocked.  One of the things I love about this pattern is the facings.  As a rule I hate facings because they flap up everywhere and I can never get them to look right but as these are top stitched down they stay in place as they are supposed to and look ever so nice and neat on the inside too.  


I am hoping my productive streak carries on now, next on my list is a dress for the Child completely inspired by Zoe's.  And then maybe some more clothes for meeeee! 

Thursday 10 September 2015

Made Up Initiative - My Finished Quilt

It has taken me over two years to make this quilt, and it is simply because I did not have a sufficient reason to finish it - other than I wanted it! - that would make it take precedence over any garment sewing I was doing, until Karen's Made Up Initiative came along and spurred me on to the finish!  


I originally started this quilt as a bit of a reaction to making a few new baby quilts for other people and I suddenly realised that I wanted a quilt too!  There was one that was particularly difficult to give away which is a very similar design (below).  I still love that quilt!  


When I ordered the fabric for it from The Village Haberdashery (in March 2013!!) Annie was running a free fat quarter week and I received two free fat quarters (the ones in the picture below) with my order.  As soon as I saw them I decided to use them as the base for my own quilt.


In that quilt I used Quilter's Linen in Grey as the background colour and liked it so much I decided to stick with it.  I have reordered a few times over the years and there is a slight colour change in the different batches but honestly a) it is more noticeable outside than inside b) I am not bothered by it c) by the time I've spilt food/hot chocolate/wine on it a few times it won't show!  The other fabrics in the quilt include an Art Gallery Fabrics design and a Cloud 9 collection called Grey Abbey.   I think they all coordinate really well together and I am really pleased with the colours - amazing really when two of the fabrics were not chosen by me!


For the backing I pieced together a few bits of fabric to fit.  The main piece is some fabric I won in a giveaway hosted by Handmade Jane (courtesy of Trixie Lixielast November!  Originally I said I would make cushions with the fabric as it was in my mind that I would need new sofa cushions to match the quilt that would be sat on it.  However when I was making the quilt top I made it a bit longer than it suited so I have two zig zags all pieced together ready to be cushions which left the lovely duck egg free to become my quilt back.  I used leftover strips for the binding which are randomly put together (note to self for any future quilting: make the binding 7cm wide not 6cm!).


I didn't use a pattern for this quilt (which would have been helpful to get the quantities right at the beginning and not keep topping up) but I did find a tutorial for making four half square triangles at once but sadly I can't find the one I used now - there are plenty out there though!  This involves cutting two squares of fabric, placing right sides together, sewing around the outside of the squares then cutting diagonally from corner to corner in both directions which results in 4 half square triangles which just need a bit of trimming and pressing.  Easy peasy!  I have plans to use this method again for my next quilt (seriously, I've started buying the fabric and everything!) but randomly placing the triangles. We'll see, I probably won't get round to it for another few years so I'll have changed my mind at least three times by then!


Right now, I am super happy with my new quilt and I know it probably would have lingered on for another few months had it not been for Karen's initiative.  As of this morning she had raised over £2500 for the National Literacy Trust which is an amazing achievement.  Thank you Karen for forcing me to finish my quilt and for raising money for such a worthy cause at the same time!